

Using Custom Domains
Why Use a Custom Domain?
When you’re deploying AI agents that send email at scale, deliverability and trust are paramount. While the default @agentmail.to domain is great for getting started, using your own custom domains is essential for production applications. It gives you control over your sending reputation and enables advanced strategies for high-volume outreach.
Setting Up Your Custom Domain
Configuring your domain is a three-step process: add the domain via API, copy the provided records into your DNS provider, and wait for verification.
1. Create Domain & Get DNS Records
Choose your preferred method to create a domain and get the required DNS records. AgentMail will register your domain and immediately return the full set of DNS records required for verification.
Console
SDK
Navigate to the AgentMail Console and follow these steps:
- Go to Domains Section: Click on “Domains” in the left sidebar
- Add New Domain: Click “Add Domain” or “Create Domain” button
- Enter Domain Name: Type your domain name (e.g.,
your-domain.com) - Create Domain: Click “Create” to register the domain
2. Add Records to Your DNS Provider
The process for adding records varies slightly between providers. The examples below assume you are configuring records in the apex domain.com hosted zone. If you are using a subdomain make sure it is in the apex domain hosted zone.
Option A: Upload BIND Zone File (Easiest)
A BIND zone file is a text file that contains DNS resource records in a standardized format. This approach allows you to bulk upload our records to your DNS provider without you needing to go down one by one.
How to use the BIND zone file:
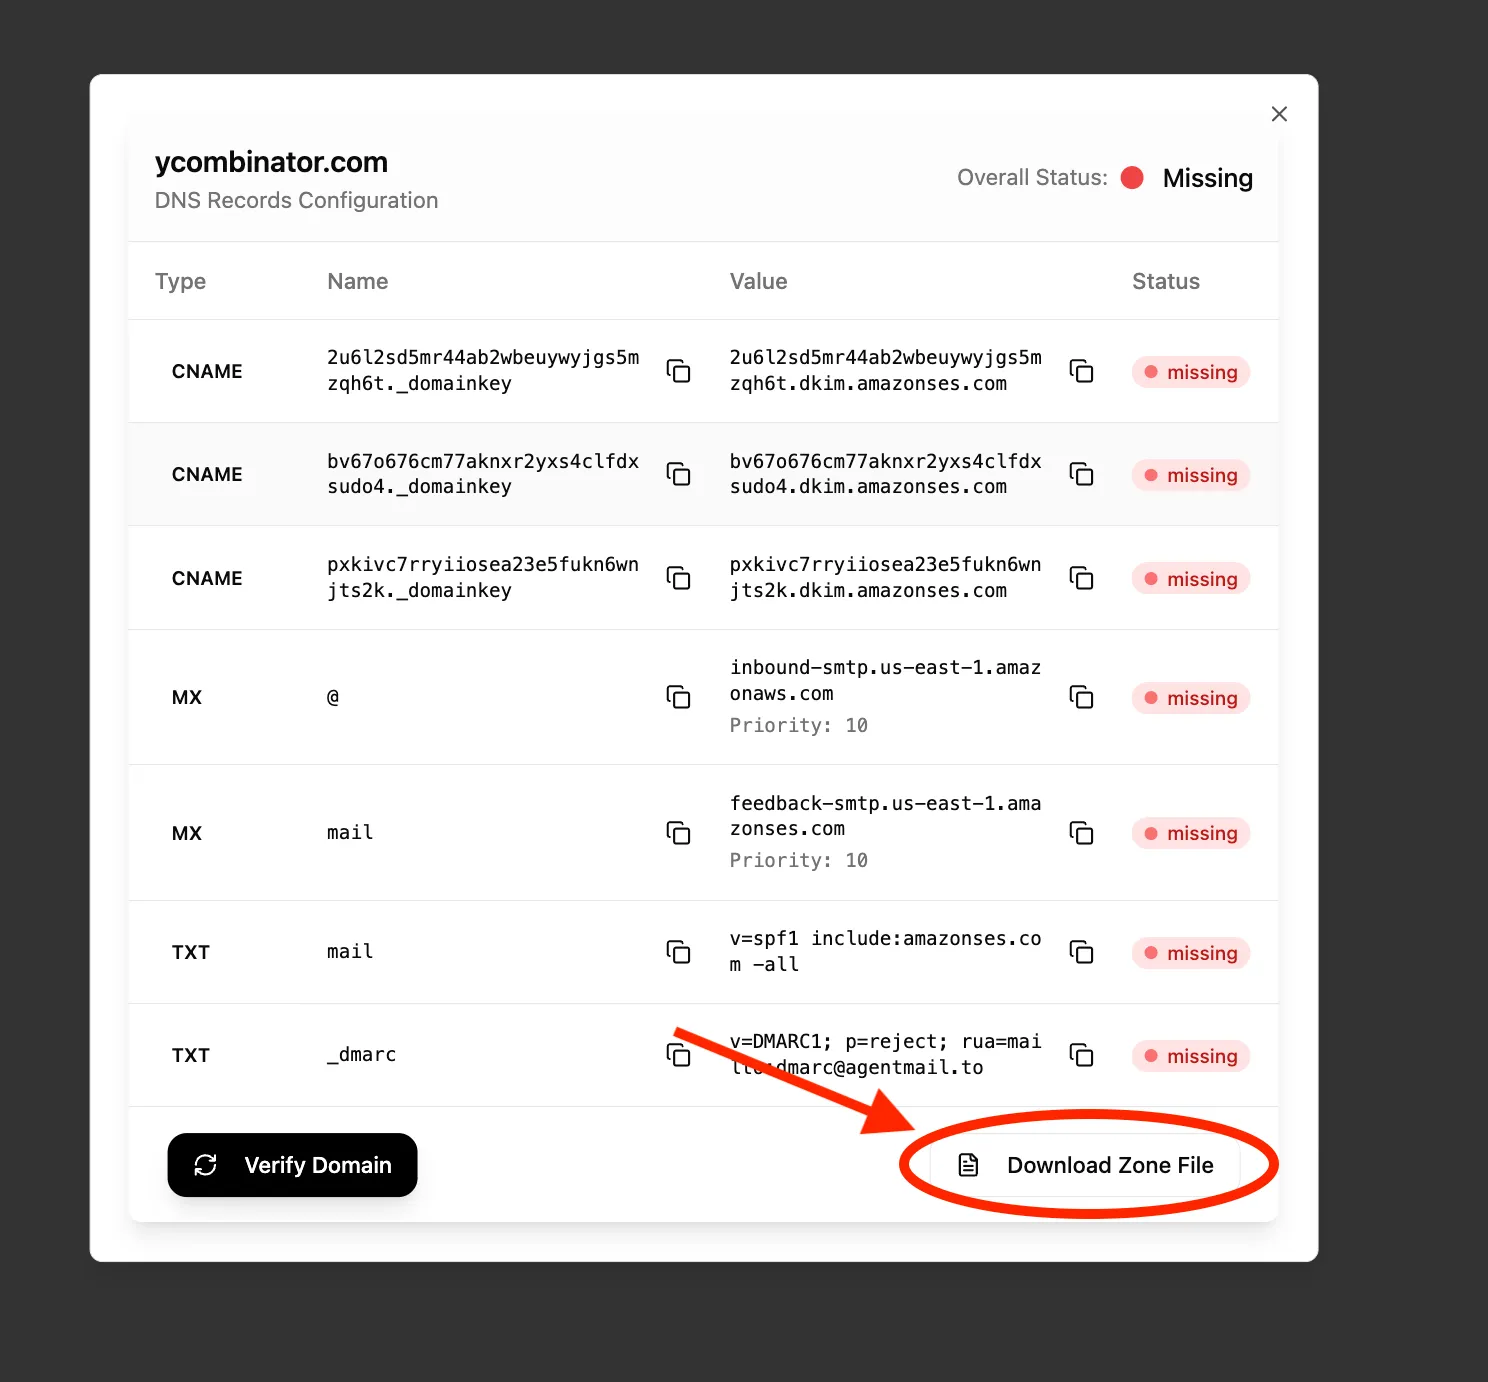
Step 1: Download the BIND zone file
After creating your domain in the AgentMail Console, click the “Download BIND Zone File” button to get the complete zone file.
Cloudflare
AWS Route 53
Porkbun
Step 2: Import to Cloudflare
- Go to your Cloudflare dashboard and select your domain
- Navigate to DNS > Records
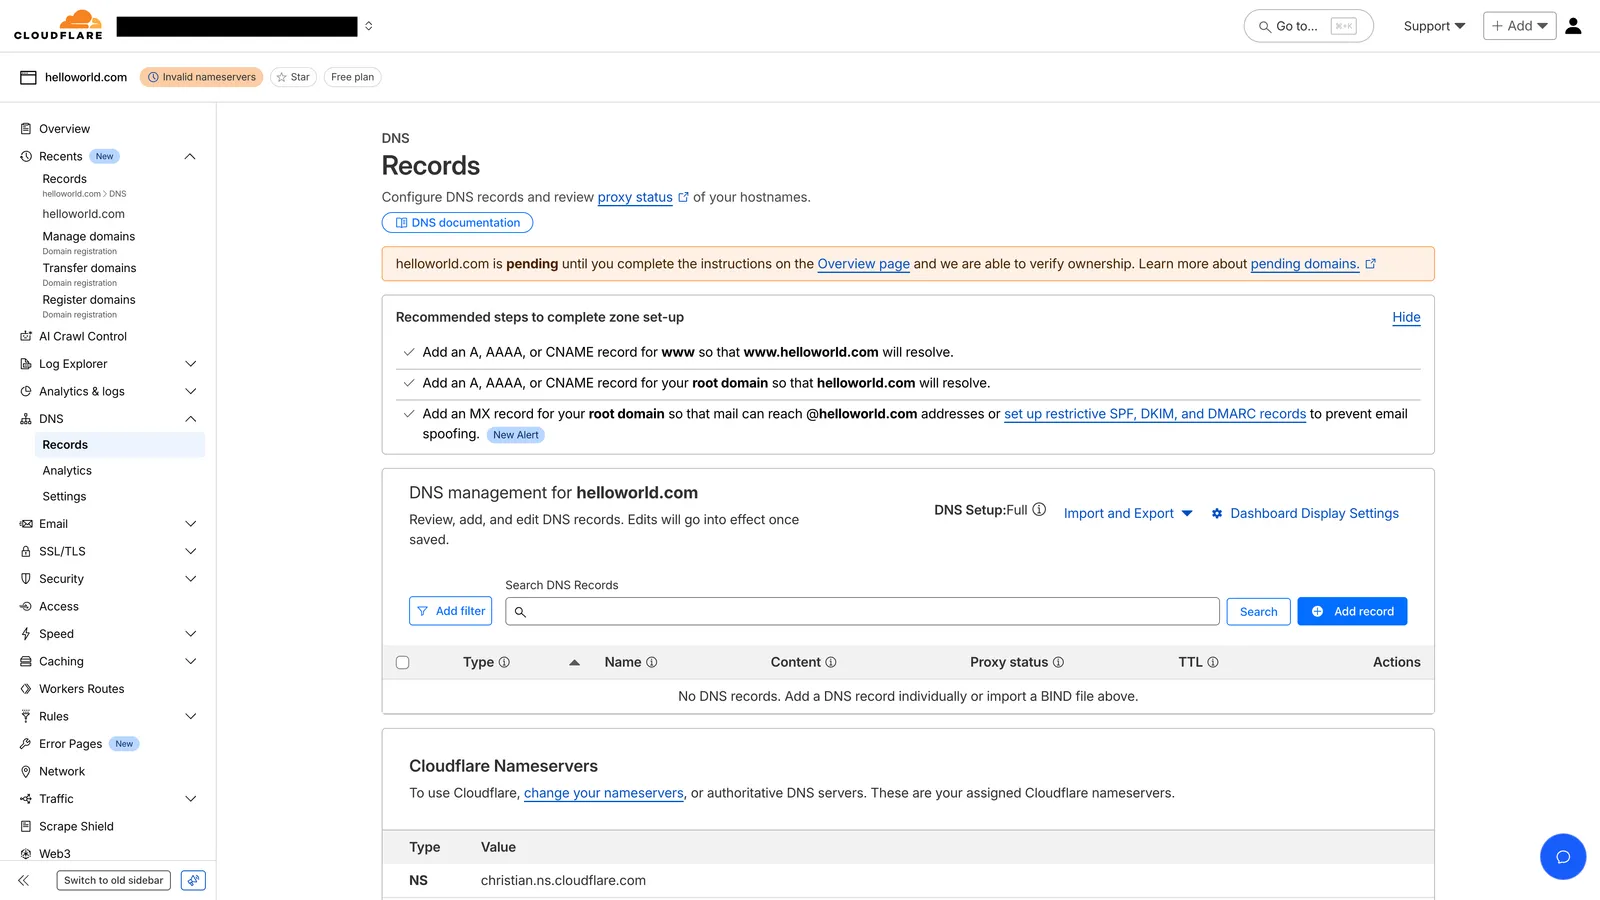
- Click “Import and Export”
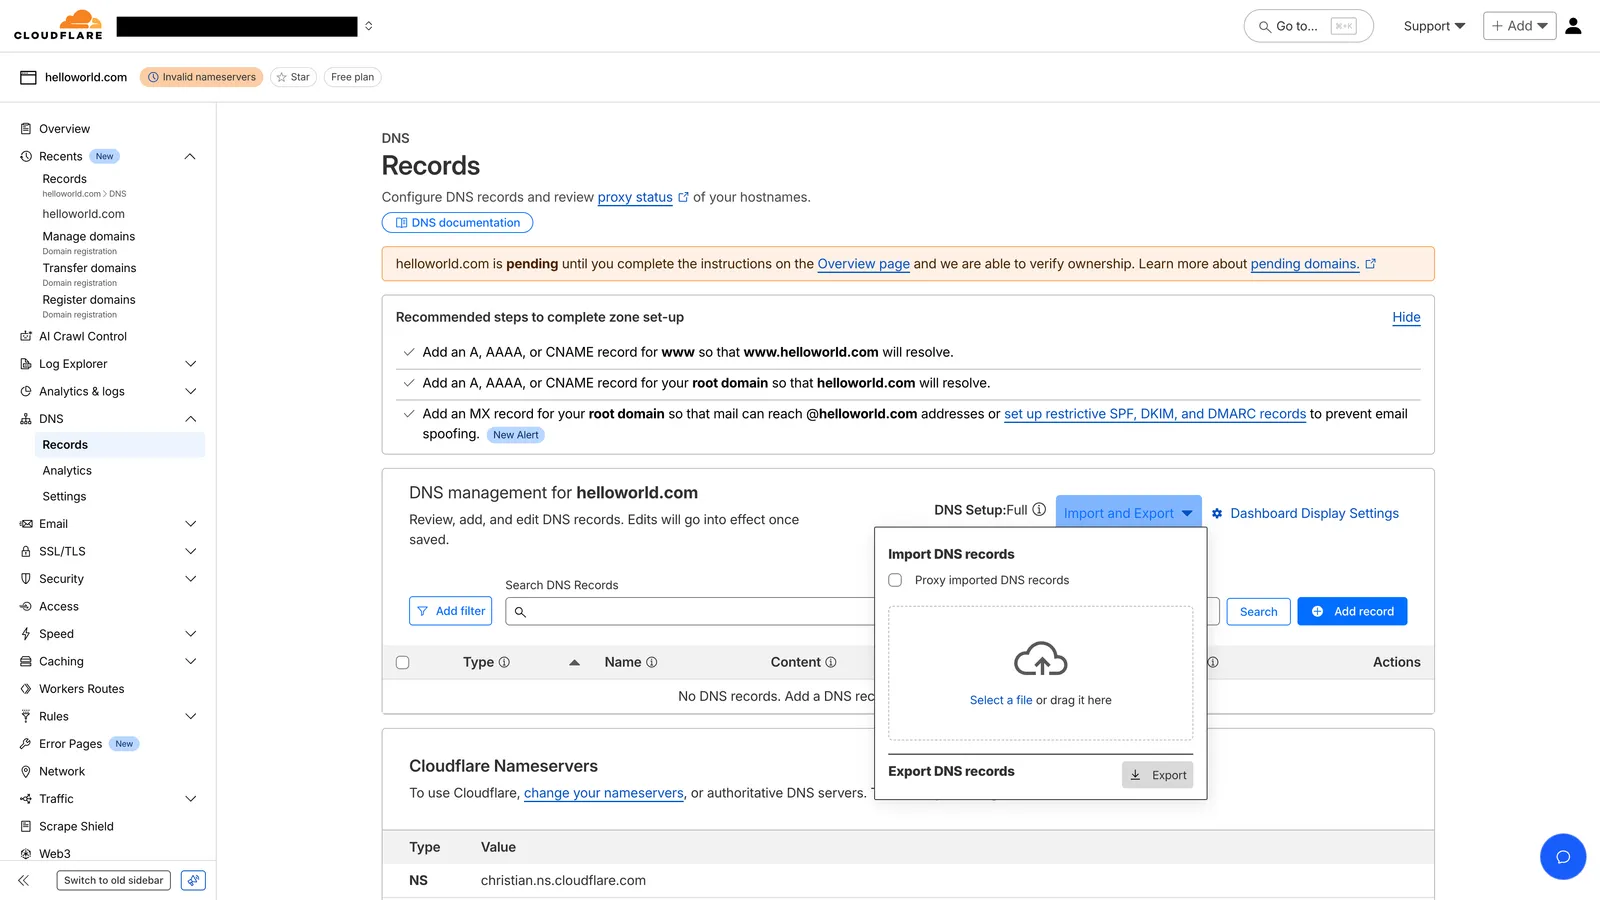
- Upload the downloaded BIND zone file as is
Check that all records (TXT, MX) have been correctly imported in the console(the console will show in real time if we can find the records, typically within seconds).
Option B: Add Individual Records
Below are detailed instructions for AWS Route53, CloudFlare, and Namecheap. The instructions vary depending on whether you’re using the AgentMail Console or the API directly.
Legacy orgs should keep existing working DNS records in place. For new domain setup, add the TXT selector records returned by the AgentMail Console or API.
Via Console
Via API
If you created your domain through the AgentMail Console, the DNS records are displayed in a simplified format that’s ready for copy-paste into your DNS provider.
Cloudflare
AWS Route 53
In the dashboard (DNS > Records), click “Add record”.
-
TXT (DMARC/SPF/DKIM):
- Name: Copy the Name value directly from the console.
- Content: Copy the Value from the console.
-
MX:
- Name: Enter
@to apply the record to the root domain. - Mail server: Copy the Value from the console.
- Priority: Use the priority shown in the console.
- Name: Enter
The console automatically formats DNS record names to be relative hostnames (without the full domain), making them ready for direct copy-paste into your DNS provider. No manual parsing required!
3. Verify Your Domain
Once you’ve added the records, AgentMail automatically begins to check them. This can take anywhere from a few minutes to 48 hours for your DNS changes to propagate across the internet.
Check your domain verification status in the AgentMail Console:
- Navigate to Domains: Go to the “Domains” section in the left sidebar
- View Domain Status: Find your domain in the list and check its status
- Monitor Progress: The status will update automatically as verification progresses
- View Details: Click on your domain to see detailed information about which records are verified
The status indicators will show you exactly where you are in the process:
Not Started: You need to click the Verify Domain button to kick start the processPending: You still need to add or fix your DNS recordsInvalid: Some of your records are misconfigured. Please verify you inputted them correctly.Failed: Your records are correct, but our servers need a bump. Please click the verify domain button in the console.Verifying: DNS records are correct, and we’re authorizing the domainVerified: Domain is fully verified and ready for sending
Here are instructions for some common DNS providers. This list is not exhaustive, so please consult your provider’s documentation if you don’t see it here.
Once your domain status is ready, you can start creating Inboxes with your
custom domain and building your agents!
Setting Up Subdomains
By default, a verified domain only hosts inboxes on the exact domain you registered (e.g. agent@example.com). To create inboxes on arbitrary subdomains (e.g. agent@bot.example.com, support@sales.example.com) without registering each subdomain as its own domain, enable subdomains on the parent domain.
To set this up, add one new required record to your top-level domain: a wildcard MX (*.example.com). Once it’s published and verified, you can create inboxes on any subdomain of the domain.
1. Enable subdomains on the domain
Set subdomains_enabled when you create the domain, or turn it on later with an update.
Enabling subdomains on an already-verified domain adds the wildcard MX as a new required record, so the domain returns to Pending until that record is published and verified. Sending is not interrupted while this happens.
2. Publish the wildcard MX record
The response records array (and the BIND zone file) now includes a wildcard MX. Add it to your DNS provider exactly like the other MX record, using * as the host:
If the domain you registered is itself a subdomain (e.g. mail.example.com), the wildcard is *.mail.example.com, so enter *.mail as the host. The console and zone file always show the exact name to use.
3. Create inboxes on any subdomain
Once the domain is Verified, create an inbox on any subdomain by passing it as the domain:
You don’t need to register bot.example.com separately: AgentMail routes it through the parent domain’s wildcard MX. Creating a subdomain inbox on a domain that does not have subdomains enabled returns a 422 error.
Subdomain inboxes don’t appear under GET /domains (only registered domains do); list your inboxes to see them.
Inboxes on a subdomain send under the parent domain’s identity and DKIM, so they share its sending reputation rather than building their own. To give a subdomain an isolated reputation, register it as a separate domain instead, see Isolate reputations with subdomains.
Troubleshooting Common DNS Issues
DNS can be tricky. Here are some common issues and how to resolve them.
My DNS changes aren't showing up instantly
DNS propagation can take up to 48 hours, though it’s often much faster. If it’s been a while, click the verify domain button in the console which will trigger a reverification manually(DNS propagation can get stuck at times).
I'm seeing 'Too many SPF records' errors
Publish only one SPF TXT record at each DNS hostname. SPF checks the SMTP MAIL FROM (Return-Path) domain, which can differ from the domain in the visible From address.
AgentMail uses a dedicated MAIL FROM subdomain for custom-domain sending, typically mail.your-domain.com. Publish the SPF record at the exact hostname shown in your domain’s DNS records in the Console or API. The sending domain and its MAIL FROM subdomain can each have their own SPF record because they are different hostnames.
Earlier versions of this guide incorrectly recommended include:spf.agentmail.to. That hostname does not publish an SPF record and must not be included in your policy. If you added it, remove that include while preserving any other authorized senders at the same hostname. Do not add include:amazonses.com to your visible From domain merely to replace it; use the exact MAIL FROM hostname and records returned for your domain. Keep the MAIL FROM MX record as well; it is separate from the MX records used to receive mail in your inboxes.
If multiple services actually use the same MAIL FROM hostname, combine their authorized mechanisms into one SPF record at that hostname. Do not merge records from different hostnames or replace another provider’s SPF record on your main domain. SPF policies must stay within the ten DNS-lookup limit.
For a failed message, check its Return-Path and Authentication-Results headers before changing DNS. DMARC requires an aligned SPF or DKIM pass; passing authentication does not guarantee inbox placement. See Amazon SES custom MAIL FROM setup for the SPF and MX requirements.
Best Practices for Domain Management
Check out our guide on Email Deliverability for tips on warming up your new domain and maintaining a healthy sender reputation.