How do you implement threading in an AI agent? Email threading is not program multithreading or a generic chat-history database. It means keeping related emails in one conversation: when a new email arrives, use its thread_id to retrieve the earlier messages, give the agent the context it needs, and reply to the inbound message so the provider keeps the response in that conversation. Store task state, such as completed tool calls or ticket IDs, separately because the email thread only preserves the conversation.
An AI email agent needs to retain the earlier messages in a conversation. That context lets it handle follow-up work such as scheduling a meeting or resolving a support request.
Say your agent offers a customer three times for an onboarding call. Two days later, the customer replies, “Tuesday afternoon works.” Without the earlier messages, the agent cannot know which meeting they mean, which options it offered, or what to do next.
Email threading keeps related messages together so the agent can recover the conversation before it acts. With the right thread, it can understand a new reply, continue work across days or weeks, and answer inside the same inbox conversation instead of starting over.
This guide explains how to implement email threading for an AI agent. We will use AgentMail because it groups related messages into threads and lets the agent retrieve a conversation before replying. We will also show how to keep long threads useful without sending every message to the model.
What does email threading mean for an AI agent?
Email threading is the system that keeps related emails in one conversation and gives an agent a stable way to retrieve them. Three components create that thread:
- Message identity. Every email gets a unique identifier in its
Message-IDheader. - Reply relationships. A reply uses
In-Reply-Toto name its direct parent andReferencesto carry the earlier message identifiers in the conversation. - A conversation record. Your email provider or application groups the related messages under one thread identifier so you can retrieve them together.
These components are enough to retrieve a conversation and reply inside it. Some agents also keep a durable work record for task status, tool results, or actions that are not present in the emails. That record can help an agent resume broader work, but it is not part of email threading and the basic implementation does not require a database.
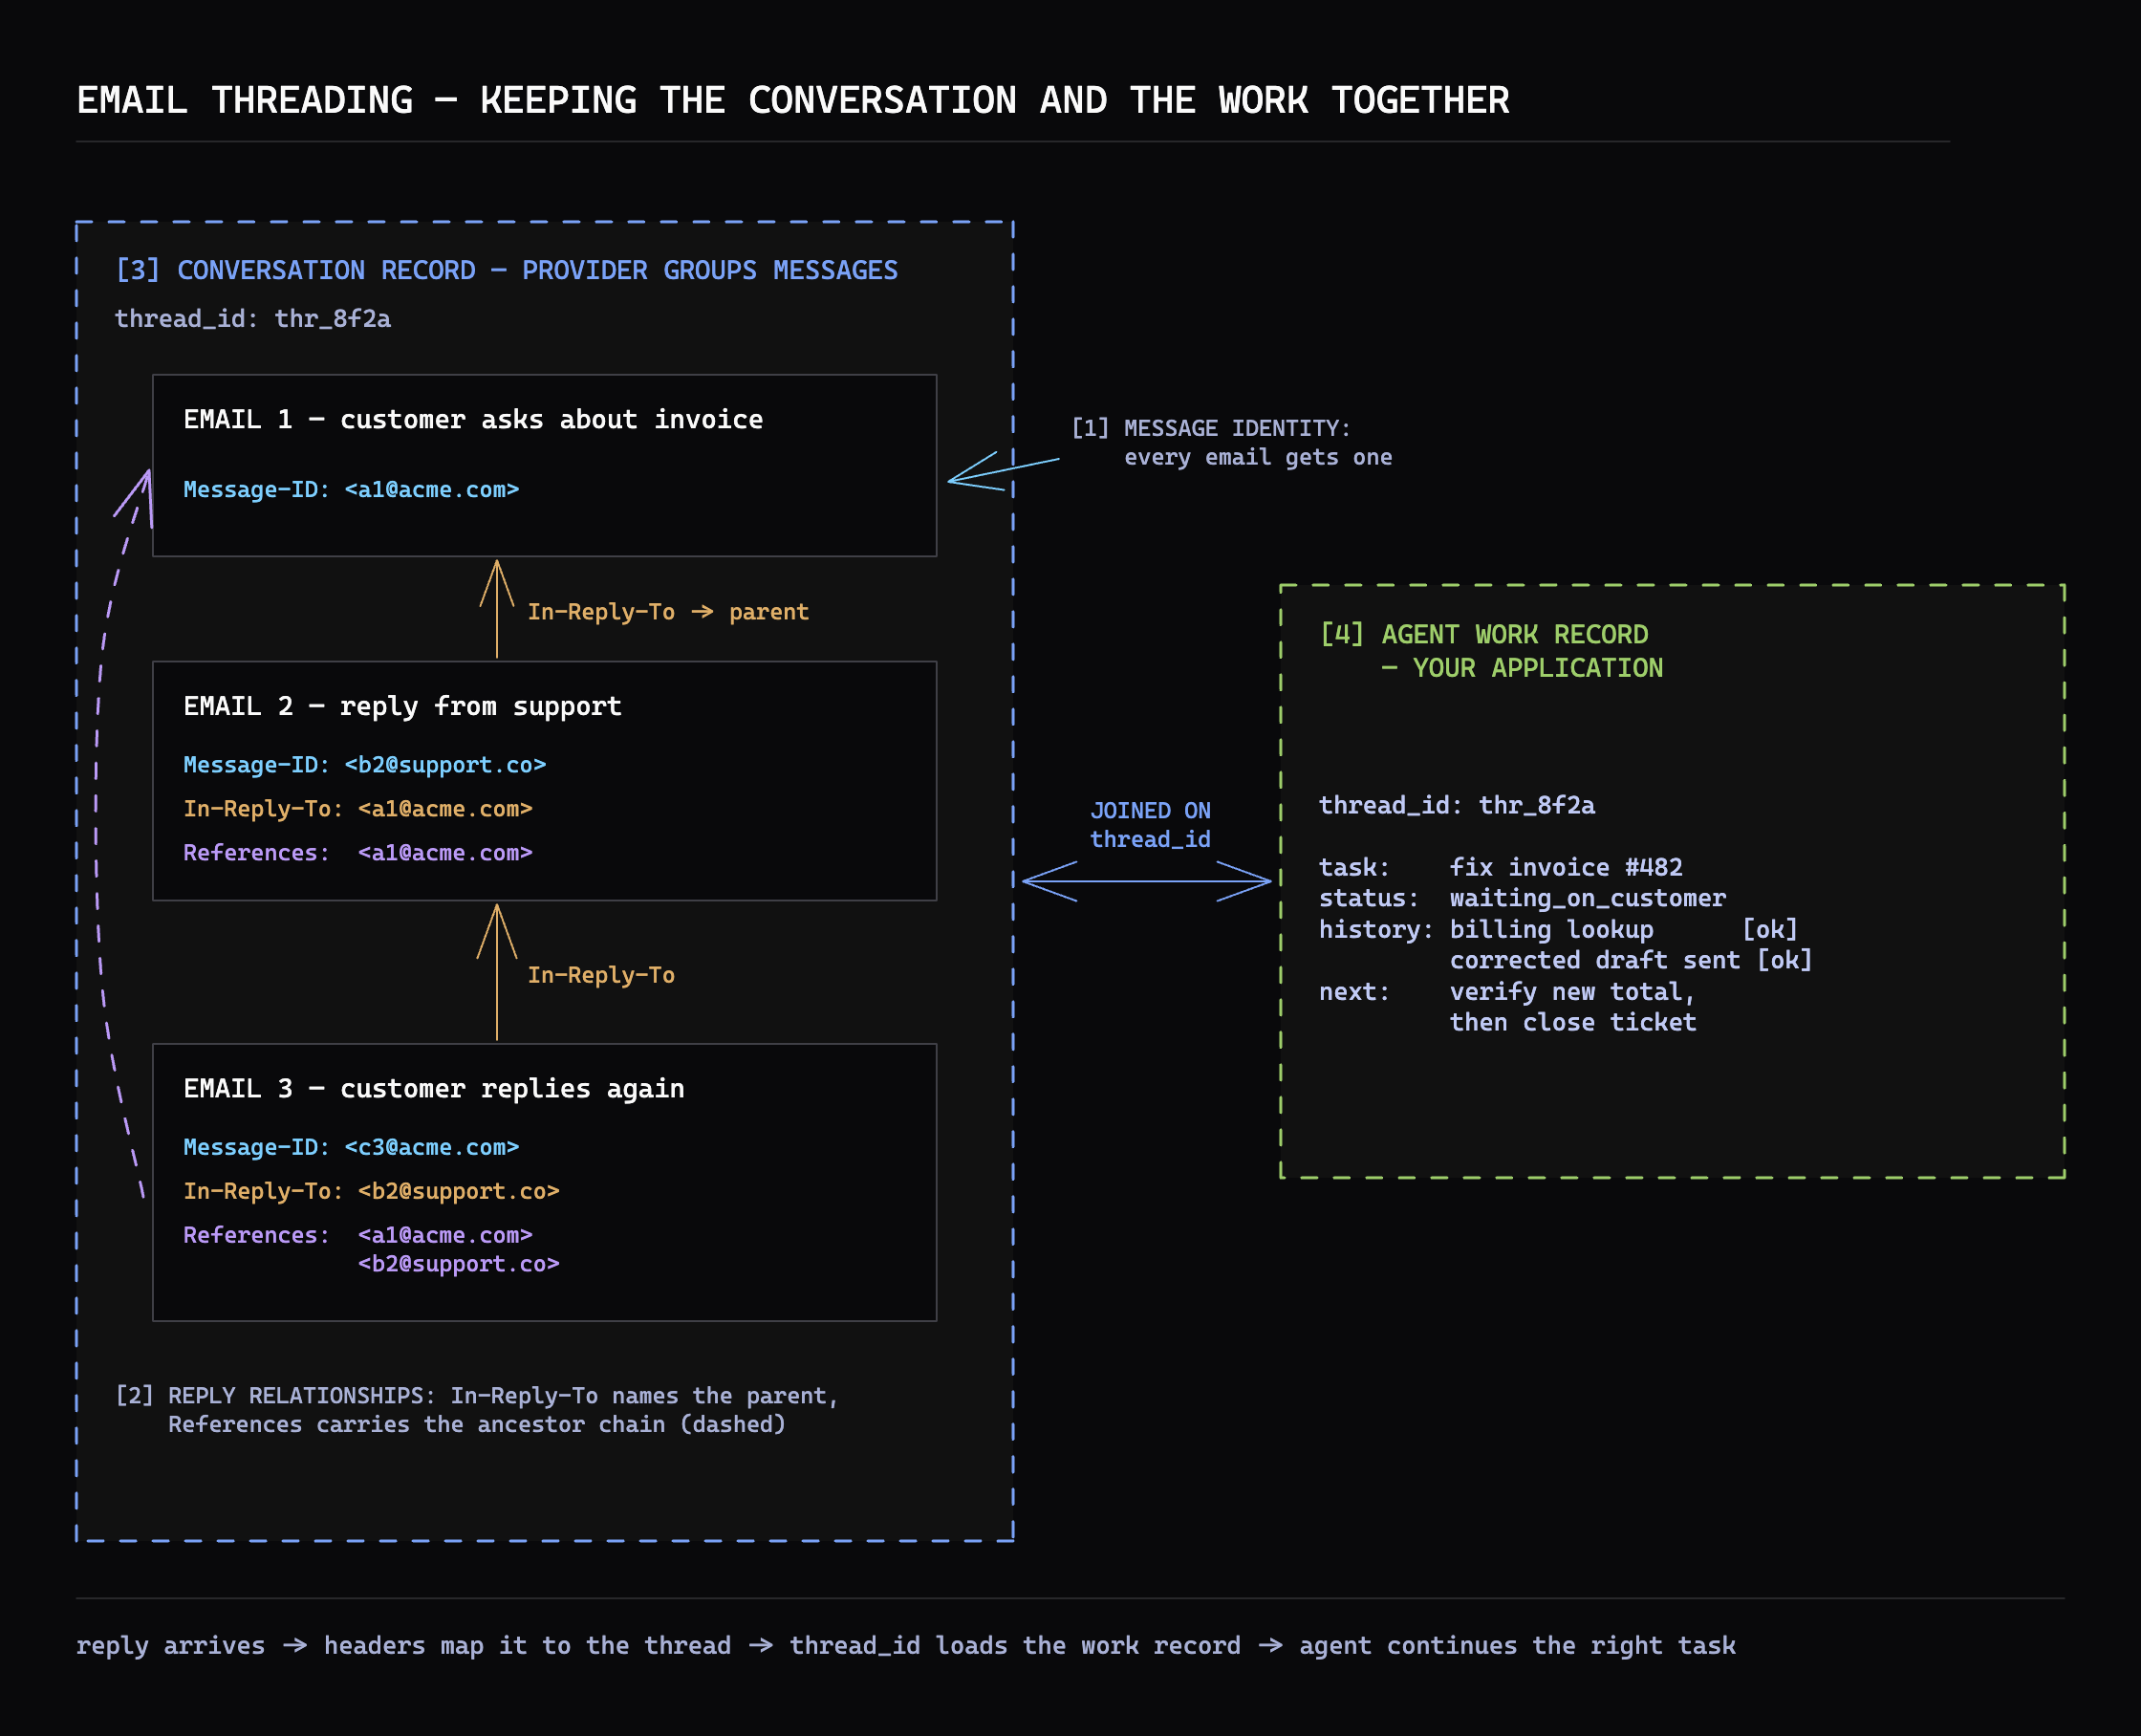
Email headers connect each reply to its parent, and AgentMail groups those messages under a thread ID. A durable work record is optional when the agent must also resume state that does not live in the email conversation.
How to implement email threading for your agent?
To implement email threading for your agent, first give it an inbox that can send, receive, and group related messages. The inbox must preserve each reply's relationship to the messages that came before it and let your agent retrieve the full conversation before it acts.
This guide uses AgentMail as a worked example because it provides programmable inboxes and handles the email-specific threading work. It creates threads automatically, groups replies into the same conversation, returns messages in chronological order, and provides a reply operation tied to a source message.
AgentMail also exposes extracted_text and extracted_html on received messages. These fields contain the new reply without the quoted conversation, which helps your agent avoid processing the same history twice. The complete conversation remains available through the Threads API.
Before you begin, create a free AgentMail account and set its API key as AGENTMAIL_API_KEY. Never commit this key or the webhook signing secret you will create later.
Implement the flow in four steps. The examples follow AgentMail’s Create Inbox, Send Message, Verify Webhooks, Create Webhook, Get Thread, and Reply To Message references.
1. Create an inbox and send the first message
Create an inbox for the agent, then send its first message from that inbox. AgentMail creates a thread automatically and returns the new message_id and thread_id. You can retrieve the thread later with that thread_id; an inbound webhook also provides both identifiers.
AgentMail CLI
agentmail inboxes create --display-name "Onboarding agent"

## Set INBOX_ID from the create response.
agentmail inboxes:messages send \
  --inbox-id "$INBOX_ID" \
  --to "customer@example.com" \
  --subject "Schedule your onboarding call" \
  --text "Would Tuesday at 2 PM, Wednesday at 11 AM, or Thursday at 3 PM work?"
cURL
curl --request POST \
  --url "https://api.agentmail.to/v0/inboxes" \
  --header "Authorization: Bearer $AGENTMAIL_API_KEY" \
  --header "Content-Type: application/json" \
  --data '{"display_name":"Onboarding agent"}'

## Set INBOX_ID from the create response.
curl --request POST \
  --url "https://api.agentmail.to/v0/inboxes/$INBOX_ID/messages/send" \
  --header "Authorization: Bearer $AGENTMAIL_API_KEY" \
  --header "Content-Type: application/json" \
  --header "Idempotency-Key: onboarding-customer-123" \
  --data '{
    "to": "customer@example.com",
    "subject": "Schedule your onboarding call",
    "text": "Would Tuesday at 2 PM, Wednesday at 11 AM, or Thursday at 3 PM work?",
    "html": "<p>Would Tuesday at 2 PM, Wednesday at 11 AM, or Thursday at 3 PM work?</p>"
  }'
TypeScript
import { AgentMailClient } from "agentmail"

const apiKey = process.env.AGENTMAIL_API_KEY
if (!apiKey) throw new Error("AGENTMAIL_API_KEY is required")

const client = new AgentMailClient({
  apiKey,
})

const inbox = await client.inboxes.create({
  displayName: "Onboarding agent",
})

const sent = await client.inboxes.messages.send(inbox.inboxId, {
  to: "customer@example.com",
  subject: "Schedule your onboarding call",
  text: "Would Tuesday at 2 PM, Wednesday at 11 AM, or Thursday at 3 PM work?",
  html: "<p>Would Tuesday at 2 PM, Wednesday at 11 AM, or Thursday at 3 PM work?</p>",
}, {
  headers: { "Idempotency-Key": "onboarding-customer-123" },
})

console.log(sent.messageId, sent.threadId)
Python
import os

from agentmail import AgentMail
from agentmail.inboxes import CreateInboxRequest

client = AgentMail(api_key=os.environ["AGENTMAIL_API_KEY"])
inbox = client.inboxes.create(
    request=CreateInboxRequest(display_name="Onboarding agent")
)

sent = client.inboxes.messages.send(
    inbox_id=inbox.inbox_id,
    to="customer@example.com",
    subject="Schedule your onboarding call",
    text="Would Tuesday at 2 PM, Wednesday at 11 AM, or Thursday at 3 PM work?",
    html="<p>Would Tuesday at 2 PM, Wednesday at 11 AM, or Thursday at 3 PM work?</p>",
    request_options={"additional_headers": {"Idempotency-Key": "onboarding-customer-123"}},
)

print(sent.message_id, sent.thread_id)
2. Create and deploy the webhook endpoint
AgentMail needs a public HTTPS endpoint that can receive inbound email events. The endpoint must verify the raw request before it trusts the payload, retrieve the event's thread, and reply to the exact message that triggered the event.
Install the libraries for your application server. The TypeScript lane uses bun add agentmail svix zod @types/bun; the Python lane uses pip install agentmail flask svix gunicorn. A CLI or cURL command can call AgentMail's API, but it cannot host this long-running endpoint.
TypeScript
import { AgentMailClient } from "agentmail"
import { Webhook } from "svix"
import { z } from "zod"

const apiKey = process.env.AGENTMAIL_API_KEY
if (!apiKey) throw new Error("AGENTMAIL_API_KEY is required")

const client = new AgentMailClient({ apiKey })

const messageReceivedSchema = z.object({
  event_type: z.literal("message.received"),
  event_id: z.string(),
  message: z.object({
    inbox_id: z.string(),
    thread_id: z.string(),
    message_id: z.string(),
  }),
})

async function verifyMessageReceived(request: Request) {
  const secret = process.env.AGENTMAIL_WEBHOOK_SECRET
  if (!secret) throw new Error("AGENTMAIL_WEBHOOK_SECRET is required")

  const payload = await request.text()
  const verified: unknown = new Webhook(secret).verify(payload, {
    "svix-id": request.headers.get("svix-id") ?? "",
    "svix-timestamp": request.headers.get("svix-timestamp") ?? "",
    "svix-signature": request.headers.get("svix-signature") ?? "",
  })

  return messageReceivedSchema.parse(verified)
}

export async function handleAgentMailWebhook(request: Request): Promise<Response> {
  let event: Awaited<ReturnType<typeof verifyMessageReceived>>
  try {
    event = await verifyMessageReceived(request)
  } catch {
    return new Response("Invalid webhook signature or payload", { status: 400 })
  }

  const {
    inbox_id: inboxId,
    thread_id: threadId,
    message_id: messageId,
  } = event.message

  const thread = await client.inboxes.threads.get(inboxId, threadId)
  if (thread.messageCount < 1) {
    return new Response("Thread is empty", { status: 409 })
  }

  // Give thread.messages to your agent and execute its chosen tools here.
  const replyText = "Great, I’ve scheduled Tuesday at 2 PM and sent the invite."

  await client.inboxes.messages.reply(
    inboxId,
    messageId,
    { text: replyText },
    { headers: { "Idempotency-Key": event.event_id } },
  )

  return new Response(null, { status: 204 })
}

Bun.serve({
  port: Number(process.env.PORT ?? "3000"),
  fetch(request) {
    const url = new URL(request.url)
    if (request.method === "POST" && url.pathname === "/webhooks/agentmail") {
      return handleAgentMailWebhook(request)
    }

    return new Response("Not found", { status: 404 })
  },
})
Save this file as agentmail-webhook.ts and run it with bun agentmail-webhook.ts.
Python
import os

from agentmail import AgentMail
from flask import Flask, request
from svix.webhooks import Webhook, WebhookVerificationError

client = AgentMail(api_key=os.environ["AGENTMAIL_API_KEY"])
app = Flask(__name__)

def verify_message_received(payload, headers):
    event = Webhook(
        os.environ["AGENTMAIL_WEBHOOK_SECRET"]
    ).verify(payload, headers)

    if event.get("event_type") != "message.received":
        raise ValueError("Unexpected event type")

    return event

@app.post("/webhooks/agentmail")
def handle_agentmail_webhook():
    try:
        event = verify_message_received(request.get_data(), request.headers)
    except (WebhookVerificationError, ValueError):
        return "Invalid webhook signature or payload", 400

    message = event["message"]
    inbox_id = message["inbox_id"]
    thread_id = message["thread_id"]
    message_id = message["message_id"]

    thread = client.inboxes.threads.get(
        inbox_id=inbox_id,
        thread_id=thread_id,
    )
    if thread.message_count < 1:
        return "Thread is empty", 409

    # Give thread.messages to your agent and execute its chosen tools here.
    reply_text = "Great, I’ve scheduled Tuesday at 2 PM and sent the invite."

    client.inboxes.messages.reply(
        inbox_id=inbox_id,
        message_id=message_id,
        text=reply_text,
        request_options={"additional_headers": {"Idempotency-Key": event["event_id"]}},
    )

    return "", 204
Save this file as agentmail_webhook.py and run it with gunicorn --bind "0.0.0.0:${PORT:-3000}" agentmail_webhook:app.
Deploy the TypeScript or Python application to a host that gives the route a public HTTPS URL, such as https://your-app.com/webhooks/agentmail. For a local test, expose port 3000 through a temporary HTTPS tunnel. Set the full public route as WEBHOOK_URL. Do not register a localhost URL: AgentMail must be able to reach the endpoint over the internet.
The handler returns 400 for a forged or malformed event and 204 only after AgentMail accepts the reply. Let transient AgentMail, model, or tool errors return a 5xx response so AgentMail retries the event. The reply uses message.message_id, not thread.messages[-1], because another email could arrive between the webhook and the response. Its event_id idempotency key ensures that a retry returns the original reply instead of sending another email.
3. Register the webhook in AgentMail
AgentMail sends a message.received event when a reply reaches the inbox. Connect that event to the endpoint you just deployed:
- Open Webhooks in the AgentMail dashboard and select Create Webhook.
- Enter
WEBHOOK_URLin Endpoint URL. Use the full route, including/webhooks/agentmail. - Under Events to send, select Message Received.
- Under Inbox IDs, select the agent inbox if this endpoint should receive events only for that inbox. Add a stable Client ID, such as
onboarding-agent-inbound, so you can identify the integration later. - Select Create Webhook. AgentMail shows the signing secret only once; copy it into your secret manager as
AGENTMAIL_WEBHOOK_SECRET, then restart or redeploy the endpoint with that environment variable.
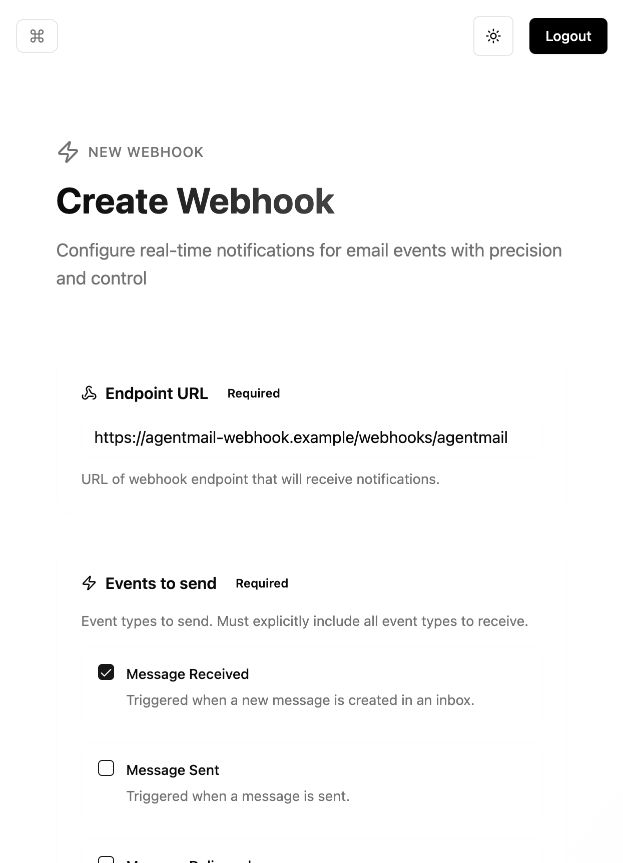
Enter the endpoint you deployed in step 2. Replace the reserved example URL shown here with your public HTTPS route.
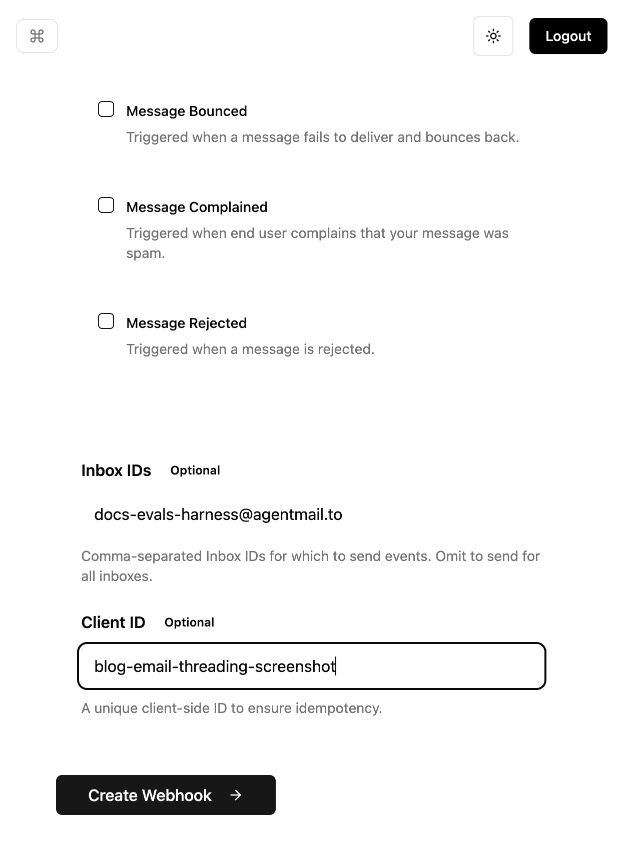
Scoping the webhook to the agent's inbox prevents unrelated inbox events from reaching the handler.
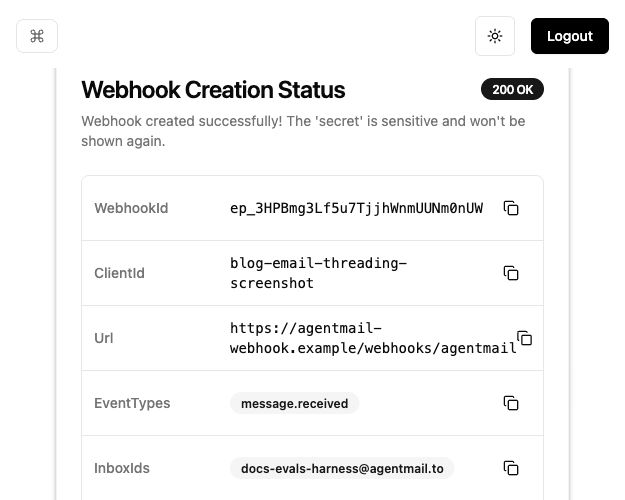
The confirmation page identifies the new webhook. The screenshot intentionally stops before the one-time signing secret; copy that secret when you create your webhook.
You can also register the same webhook from code.
AgentMail CLI
agentmail webhooks create \
  --url "$WEBHOOK_URL" \
  --event-type message.received \
  --client-id "onboarding-agent-inbound"
cURL
curl --request POST \
  --url "https://api.agentmail.to/v0/webhooks" \
  --header "Authorization: Bearer $AGENTMAIL_API_KEY" \
  --header "Content-Type: application/json" \
  --data "{
    \"url\": \"$WEBHOOK_URL\",
    \"event_types\": [\"message.received\"],
    \"inbox_ids\": [\"$INBOX_ID\"],
    \"client_id\": \"onboarding-agent-inbound\"
  }"
TypeScript
const webhookUrl = process.env.WEBHOOK_URL

if (!webhookUrl) {
  throw new Error("WEBHOOK_URL is required")
}

const webhook = await client.webhooks.create({
  url: webhookUrl,
  eventTypes: ["message.received"],
  inboxIds: [inbox.inboxId],
  clientId: "onboarding-agent-inbound",
})

// Copy this value into your secret manager as AGENTMAIL_WEBHOOK_SECRET.
console.log(webhook.secret)
Python
webhook = client.webhooks.create(
    url=os.environ["WEBHOOK_URL"],
    event_types=["message.received"],
    inbox_ids=[inbox.inbox_id],
    client_id="onboarding-agent-inbound",
)

## Copy this value into your secret manager as AGENTMAIL_WEBHOOK_SECRET.
print(webhook.secret)
The CLI command creates an account-level webhook, so the receiver may see events from other inboxes. The cURL and SDK examples scope delivery to the new inbox. In either case, use message.inbox_id from the event rather than assuming which inbox received it.
4. Test the complete loop
Send the first message to a mailbox you control, then reply from that mailbox. A complete implementation should produce all five results:
- AgentMail delivers one verified
message.receivedevent to your endpoint. - The event's
thread_idretrieves the original message and the inbound reply in chronological order. - The agent receives that conversation as context for its decision.
- The reply uses the webhook’s exact
message_id, and AgentMail returns the originalthread_id. - Replaying the same webhook event does not send a second email.
When does an email agent need durable state?
Email threading does not require your own database. AgentMail stores the messages and their thread relationship, while the webhook gives your handler the identifiers it needs to retrieve and reply to the conversation.
Add durable state when the agent must remember something that the email thread cannot reconstruct. Examples include a pending approval, a calendar event ID, a support ticket status, or the result of a tool call that must survive a worker restart. You can use your existing database, a key-value store, or a durable workflow engine; you do not need a database dedicated to email.
Durable state also matters when the handler performs a non-email side effect. AgentMail's idempotency key prevents a webhook retry from sending the same reply twice, but it cannot prevent the handler from booking the same meeting or creating the same ticket twice. Pass idempotency keys to those tools when they support them, or record the webhook's event_id in the durable system that runs the action. Key any thread-level state by thread_id so a later webhook can recover it.
How should an agent assign inbound email to a thread?
Your agent should assign inbound email by selecting one parent identifier from the reply metadata and looking up the message it belongs to. Use this sequence:
- Read
In-Reply-To. When it is present, treat it as the intended parent identifier. - When
In-Reply-Tois absent, use the newest identifier inReferences, the header that carries the identifiers of earlier messages in the conversation. - Look up that identifier in the messages you have stored.
- If the parent exists, reuse its thread identifier. If it does not, start a new thread or route the message for review.
Do not merge messages by subject alone. Two unrelated emails can share a subject, and some automated messages arrive without usable reply metadata. A conservative resolver creates a new conversation instead of guessing.
AgentMail follows this sequence automatically. It uses In-Reply-To when the field is present and checks the newest References value only when In-Reply-To is absent. If the selected parent matches a stored message, the inbound email inherits that message’s thread_id; otherwise, AgentMail creates a new thread. Your application can use the incoming thread_id instead of rebuilding this resolver.
What should an agent do with a long email thread?
Keep the complete email thread available, but build a smaller context for each model call. Thread membership preserves the conversation; prompt context contains only what the agent needs for its next action.
- Retrieve the thread when a new message arrives.
- Give the model the new reply and the recent messages relevant to the decision.
- Fetch an older message or large body only when the current action depends on it.
- Cache a compact summary only when repeatedly rebuilding context becomes too slow or expensive.
The inbox retains the complete thread, so the agent can retrieve older details without placing every message in every prompt.
Create an AgentMail account to give your agent an inbox and keep its conversations connected to the work it is doing.